Jedis操作Redis
jedis就是集成了redis的一些命令操作,封装了redis的java客户端。提供了连接池管理。一般不直接使用jedis,而是在其上在封装一层,作为业务的使用。
1.Jedis所需的jar包
<dependency>
	<groupId>redis.clients</groupId>
	<artifactId>jedis</artifactId>
	<version>4.3.1</version>
</dependency>
2.创建测试程序
package com.bo.jedis;

import redis.clients.jedis.Jedis;

public class JedisDemo1 {
    public static void main(String[] args) {
        //创建jedis对象,参数为我们要连接redis的主机地址
        Jedis jedis = new Jedis("47.113.198.157",6379);
        //测试
        String value = jedis.ping();
        System.out.println(value);
    }
}
第一次报错连接失败,因为我们要连接linux服务器要检测linux防火墙是否开启,不然如果开了防火墙会连不上
下面合成为一个注意事项:
3.连接Redis注意事项
检查防火墙状态:
systemctl status firewalld
禁用Linux的防火墙:Linux(CentOS7)里执行命令:
systemctl stop/disable firewalld.service
redis.conf中注释掉bind 127.0.0.1,然后 protected-mode no
结果我发现我的防火墙是关闭的,其他设置也没有任何问题,是没有正确设置安全组
然后我在阿里云官网设置好安全组,找到我自己的ip,并为我的ip开放6379端口号即可
然后又有新问题,需要输入密码才能连接:
package com.bo.jedis;

import redis.clients.jedis.Jedis;

public class JedisDemo1 {
    public static void main(String[] args) {
        //创建jedis对象,参数为我们要连接redis的主机地址
        Jedis jedis = new Jedis("47.113.198.157",6379);
        jedis.auth("wyb17780902277");
        //测试
        String value = jedis.ping();
        System.out.println(value);
		//关闭资源
        jedis.close();
    }
}
成功输出!
测试2:
    //操作key
    @Test
    public void demo1(){
        Jedis jedis = new Jedis("47.113.198.157",6379);
        jedis.auth("wyb17780902277");

        //添加
        jedis.set("name","bo");

        Set<String> keys = jedis.keys("*");
        for (String key : keys) {
            System.out.println(key);
        }

        jedis.close();
    }
}
其实我们可以发现jedis的方法和我们学习的redis的命令都差不多。
4.测试相关数据类型
4.1 Jedis-API:Key
jedis.set("k1", "v1");
jedis.set("k2", "v2");
jedis.set("k3", "v3");

Set<String> keys = jedis.keys("*");
System.out.println(keys.size());

for (String key : keys) {
	System.out.println(key);
}

System.out.println(jedis.exists("k1"));
System.out.println(jedis.ttl("k1"));
System.out.println(jedis.get("k1"));
4.2 Jedis-API:String
jedis.mset("str1","v1","str2","v2","str3","v3");
System.out.println(jedis.mget("str1","str2","str3"));
4.3 Jedis-API:list
List<String> list = jedis.lrange("mylist",0,-1);
for (String element : list) {
	System.out.println(element);
}
4.4 Jedis-API:set
jedis.sadd("orders", "order01");
jedis.sadd("orders", "order02");
jedis.sadd("orders", "order03");
jedis.sadd("orders", "order04");

Set<String> smembers = jedis.smembers("orders");

for (String order : smembers) {
	System.out.println(order);
}

jedis.srem("orders", "order02");
4.5 Jedis-API:hash
jedis.hset("hash1","userName","lisi");
System.out.println(jedis.hget("hash1","userName"));

//可以先new一个k-v的map,将map以参数的形式传入新的hash
Map<String,String> map = new HashMap<String,String>();
map.put("telphone","13810169999");
map.put("address","atguigu");
map.put("email","abc@163.com");

jedis.hmset("hash2",map);

List<String> result = jedis.hmget("hash2", "telphone","email");

for (String element : result) {
	System.out.println(element);
}
4.6 Jedis-API:zset
jedis.zadd("zset01", 100d, "z3");
jedis.zadd("zset01", 90d, "l4");
jedis.zadd("zset01", 80d, "w5");
jedis.zadd("zset01", 70d, "z6");

Set<String> zrange = jedis.zrange("zset01", 0, -1);

for (String e : zrange) {
	System.out.println(e);
}
Jedis案例:模拟验证码发送
要求: 1、输入手机号,点击发送后随机生成6位数字码,2分钟有效 2、输入验证码,点击验证,返回成功或失败 3、每个手机号每天只能输入3次
分析要求得到步骤:
- 实现生成六位验证码
- 实现验证码只有两分钟有效期(可以把验证码存到redis中,设置过期时间)
- 判断验证码是否一致
- 实现发送大于三次即发送失败(incr每次发送后值加一,当这个值>2,提示不能再发送)
package com.bo.jedis;

import redis.clients.jedis.Jedis;

import java.util.Random;

public class PhoneCode {
    public static void main(String[] args) {
        //模拟验证码发送
        createCode("17709092277");
    }

    //生成六位验证码
    public static String getCode(){
        Random random = new Random();
        String code = "";
        for (int i = 0; i < 6; i++) {
            int rand = random.nextInt(10);
            code += rand;
        }
        return code;
    }

    //jedis相关操作,处理三天时限和两分钟过期
    public static void createCode(String phone){
        Jedis jedis = new Jedis("47.113.198.157",6379);
        jedis.auth("wyb17780902277");

        //拼接key
        //手机发送次数
        String countKey = "VerifyCode:" + phone + ":count";

        //验证码的key
        String codeKey = "VerifyCode" + phone + ":code";

        //每个手机一天只能发三次,根据countKEY获得次数
        String count = jedis.get("countKey");
        if (count == null){
            //没有发送次数,表示是第一次发送
            jedis.setex(countKey,24*60*60,"1");//过期时间为一天,即每天更新一次
        } else if (Integer.parseInt(count) <= 2) {
            jedis.incr(count);//发送次数+1就可
        }else if (Integer.parseInt(count) > 2) {
            System.out.println("今天发送次数已经超出三次");
            return;
        }

        //验证码放到redis里面
        String vCode = getCode();
        jedis.setex(codeKey,120,vCode);

        jedis.close();
    }

    //判断是否一致
    public static void verifyCode(String phone,String code){
        Jedis jedis = new Jedis("47.113.198.157",6379);
        jedis.auth("wyb17780902277");

        String codeKey = "VerifyCode" + phone + ":code";

        if (jedis.get(codeKey).equals(code)){
            System.out.println("正确");
        }else System.out.println("错误");


        jedis.close();
    }
}
然后做测试:
public static void main(String[] args) {
    //模拟验证码发送
    createCode("17709092277");
}
先第一次生成验证码,然后去redis看看有没有
127.0.0.1:6379> keys *

1) "VerifyCode17709092277:code"
2) "VerifyCode:17709092277:count"
   127.0.0.1:6379> get VerifyCode17709092277:code
   "544817"
   127.0.0.1:6379> get VerifyCode:17709092277:count
   "1"
可以看到成功了
然后再校验:
public static void main(String[] args) {
    //模拟验证码发送
    verifyCode("17709092277","544817");
}
成功
Redis与SpringBoot整合
Spring Boot整合Redis非常简单,首先创建一个Springboot项目
- 在pom.xml文件中引入redis相关依赖
<!-- https://mvnrepository.com/artifact/org.springframework.boot/spring-boot-starter-data-redis -->
<dependency>
    <groupId>org.springframework.boot</groupId>
    <artifactId>spring-boot-starter-data-redis</artifactId>
    <version>3.0.1</version>
</dependency>
<!-- https://mvnrepository.com/artifact/org.apache.commons/commons-pool2 -->
<dependency>
    <groupId>org.apache.commons</groupId>
    <artifactId>commons-pool2</artifactId>
    <version>2.11.1</version>
</dependency>
2.application.properties配置redis配置
# redis
spring.redis.host=47.113.198.157
#Redis服务器连接端口
spring.redis.port=6379
#Redis数据库索引(默认为0)
spring.redis.database= 0
#连接超时时间(毫秒)
spring.redis.timeout=1800000
#连接池最大连接数(使用负值表示没有限制)
spring.redis.lettuce.pool.max-active=20
#最大阻塞等待时间(负数表示没限制)
spring.redis.lettuce.pool.max-wait=-1
#连接池中的最大空闲连接
spring.redis.lettuce.pool.max-idle=5
#连接池中的最小空闲连接
spring.redis.lettuce.pool.min-idle=0
#密码!
spring.redis.password=wyb17780902277
3.添加Redis配置类
package com.bo.redis_springboot.config;

import com.fasterxml.jackson.annotation.JsonAutoDetect;
import com.fasterxml.jackson.annotation.PropertyAccessor;
import com.fasterxml.jackson.databind.ObjectMapper;
import org.springframework.cache.CacheManager;
import org.springframework.cache.annotation.CachingConfigurerSupport;
import org.springframework.cache.annotation.EnableCaching;
import org.springframework.context.annotation.Bean;
import org.springframework.context.annotation.Configuration;
import org.springframework.data.redis.cache.RedisCacheConfiguration;
import org.springframework.data.redis.cache.RedisCacheManager;
import org.springframework.data.redis.connection.RedisConnectionFactory;
import org.springframework.data.redis.core.RedisTemplate;
import org.springframework.data.redis.serializer.Jackson2JsonRedisSerializer;
import org.springframework.data.redis.serializer.RedisSerializationContext;
import org.springframework.data.redis.serializer.RedisSerializer;
import org.springframework.data.redis.serializer.StringRedisSerializer;

import java.time.Duration;

@EnableCaching
@Configuration
public class RedisConfig extends CachingConfigurerSupport {
    @Bean
    public RedisTemplate<String, Object> redisTemplate(RedisConnectionFactory factory) {
        RedisTemplate<String, Object> template = new RedisTemplate<>();
        RedisSerializer<String> redisSerializer = new StringRedisSerializer();
        Jackson2JsonRedisSerializer jackson2JsonRedisSerializer = new Jackson2JsonRedisSerializer(Object.class);
        ObjectMapper om = new ObjectMapper();
        om.setVisibility(PropertyAccessor.ALL, JsonAutoDetect.Visibility.ANY);
        om.enableDefaultTyping(ObjectMapper.DefaultTyping.NON_FINAL);
        jackson2JsonRedisSerializer.setObjectMapper(om);
        template.setConnectionFactory(factory);
        //key序列化方式
        template.setKeySerializer(redisSerializer);
        //value序列化
        template.setValueSerializer(jackson2JsonRedisSerializer);
        //value hashmap序列化
        template.setHashValueSerializer(jackson2JsonRedisSerializer);
        return template;
    }

    @Bean
    public CacheManager cacheManager(RedisConnectionFactory factory) {
        RedisSerializer<String> redisSerializer = new StringRedisSerializer();
        Jackson2JsonRedisSerializer jackson2JsonRedisSerializer = new Jackson2JsonRedisSerializer(Object.class);
        //解决查询缓存转换异常的问题
        ObjectMapper om = new ObjectMapper();
        om.setVisibility(PropertyAccessor.ALL, JsonAutoDetect.Visibility.ANY);
        om.enableDefaultTyping(ObjectMapper.DefaultTyping.NON_FINAL);
        jackson2JsonRedisSerializer.setObjectMapper(om);
        // 配置序列化(解决乱码的问题),过期时间600秒
        RedisCacheConfiguration config = RedisCacheConfiguration.defaultCacheConfig()
                .entryTtl(Duration.ofSeconds(600))
                .serializeKeysWith(RedisSerializationContext.SerializationPair.fromSerializer(redisSerializer))
                .serializeValuesWith(RedisSerializationContext.SerializationPair.fromSerializer(jackson2JsonRedisSerializer))
                .disableCachingNullValues();
        RedisCacheManager cacheManager = RedisCacheManager.builder(factory)
                .cacheDefaults(config)
                .build();
        return cacheManager;
    }
}
这是固定写法!
4.测试一下:RedisTestController中添加测试方法
@RestController
public class RedisTestController {

    @Resource
    private RedisTemplate redisTemplate;

    @GetMapping("/redis")
    public String testRedis(){
        //通过提供的RedisTemplate类来操作
        //设置值到redis
        redisTemplate.opsForValue().set("name","bo");
        //从redis中获取值
        Object name = redisTemplate.opsForValue().get("name");
        return String.valueOf(name);
    }
}
第一次启动报错了,服务器500:
nested exception is org.springframework.data.redis.connection.PoolException: Could not get a resource from the pool; nested exception is io.lettuce.core.RedisConnectionException: Unable to connect to 47.113.198.157:6379] with root cause
说是没有连接上redis,老生常谈,如果connect出问题,检查:
你的redis-conf文件配置是否合理
-
修改 protected-mode yes 改为:protected-mode no
- 注释掉 #bin 127.0.0.1
- 是否开放端口6379(安全组)
- 防火墙是否关闭
- 密码!如果设置了密码一定要在配置文件中写!
这次是因为密码!
#密码!
spring.redis.password=wyb17780902277
加到配置文件
事务和锁机制
1.Redis的事务定义
Redis事务是一个单独的隔离操作:事务中的所有命令都会序列化、按顺序地执行。事务在执行的过程中,不会被其他客户端发送来的命令请求所打断。
Redis事务的主要作用就是串联多个命令防止别的命令插队。
2.Multi、Exec、discard
从输入Multi命令开始,输入的命令都会依次进入命令队列中,但不会执行,直到输入Exec后,Redis会将之前的命令队列中的命令依次执行。
组队的过程中可以通过discard来放弃组队。

下面演示一下事务:
127.0.0.1:6379> MULTI
OK
127.0.0.1:6379(TX)> set k1 v1
QUEUED
127.0.0.1:6379(TX)> set k2 v2
QUEUED
127.0.0.1:6379(TX)> exec
1) OK
2) OK
discard:
127.0.0.1:6379> MULTI
OK
127.0.0.1:6379(TX)> set k1 v1
QUEUED
127.0.0.1:6379(TX)> set k2 v2
QUEUED
127.0.0.1:6379(TX)> DISCARD
OK
127.0.0.1:6379> keys *
(empty array)
3.事务的错误处理
组队中某个命令出现了报告错误,执行时整个的所有队列都会被取消

如果执行阶段某个命令报出了错误,则只有报错的命令不会被执行,而其他的命令都会执行,不会回滚。

总结:
- 组队阶段的命令报错失败,所有队列中命令不执行
- 执行阶段命令报错失败,只有错误命令不执行,不会回滚!
4.事务冲突问题
4.1 例子
一个请求想给金额减8000 一个请求想给金额减5000 一个请求想给金额减1000
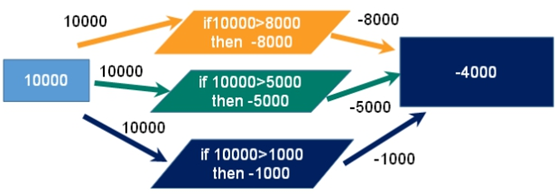
如果按这个顺序,第一个人买了8000,账户只剩2000.再买了5000,变-3000,最后账户-4000。因为我们没有加事务,所以产生了冲突
4.2 悲观锁(解决事务冲突)
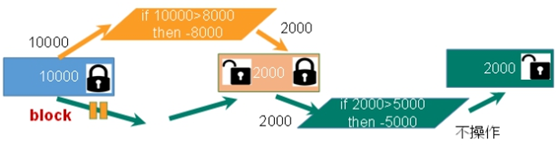
,顾名思义,就是很悲观,每次去拿数据的时候都认为别人会修改,所以每次在拿数据的时候都会上锁,这样别人想拿这个数据就会block直到它拿到锁。传统的关系型数据库里边就用到了很多这种锁机制,比如行锁,表锁等,读锁,写锁等,都是在做操作之前先上锁。
4.3 乐观锁(解决事务冲突)
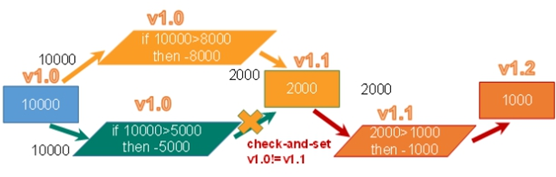 乐观锁(Optimistic Lock),顾名思义,就是很乐观,每次去拿数据的时候都认为别人不会修改,所以不会上锁,但是在更新的时候会判断一下在此期间别人有没有去更新这个数据,可以使用版本号等机制。乐观锁适用于多读的应用类型,这样可以提高吞吐量。Redis就是利用这种check-and-set机制实现事务的
例如上图,再作操作之前都会有一个判断check 当前版本号与数据库版本号是否一致,如果8000的那个请求更快,已经更改了数据,那么存款变成2000,版本变成1.1,5000的请求在做操作之前就无法通过check,操作就不会进行
4.4 乐观锁在Redis中的具体使用
watch key [key…]
在执行multi之前,先执行watch key1 [key2],可以监视一个(或多个) key ,如果在事务执行之前这个(或这些) key 被其他命令所改动,那么事务将被打断。
在xshell上再新建一个会话,再连接redis添加一个客户端
先添加一个数据:
127.0.0.1:6379> set balance 100
OK
r然后在两个客户端都去watch一下,然后两个客户端都用multi开启事务,然后分别对balance进行加操作:
127.0.0.1:6379> watch balance
OK
127.0.0.1:6379> multi
OK
127.0.0.1:6379(TX)> incrby balance 10
QUEUED
127.0.0.1:6379(TX)> exec
1) (integer) 110
127.0.0.1:6379>
这是第一个客户端,可以看到对原来的值100,加10成功执行
127.0.0.1:6379> watch balance
OK
127.0.0.1:6379> muti
(error) ERR unknown command 'muti', with args beginning with:
127.0.0.1:6379> multi
OK
127.0.0.1:6379(TX)> incrby balance 20
QUEUED
127.0.0.1:6379(TX)> exec
(nil)
这是第二个客户端,我们发现加20的操作并没有被执行。因为版本号已经改变了
展示了乐观锁过程:
在执行multi之前,先执行watch key1 [key2],可以监视一个(或多个) key ,如果在事务执行之前这个(或这些) key 被其他命令所改动,那么事务将被打断。
unwatch
取消 WATCH 命令对所有 key 的监视。
如果在执行 WATCH 命令之后,EXEC 命令或DISCARD 命令先被执行了的话,那么就不需要再执行UNWATCH 了。
5.Redis事务三大特性
- 单独的隔离操作: 事务中的所有命令都会序列化、按顺序地执行。事务在执行的过程中,不会被其他客户端发送来的命令请求所打断。
- 没有隔离级别的概念: 队列中的命令没有提交之前都不会实际被执行,因为事务提交前任何指令都不会被实际执行
- 不保证原子性: 事务中如果有一条命令执行失败,其后的命令仍然会被执行,没有回滚
6、秒杀案例

若干人抢一种商品,每有一个人秒杀成功,商品个数减一,成功者人数加一
先略过
Redis持久化操作
Redis 提供了2个不同形式的持久化方式。
- RDB(Redis DataBase)
- AOF(Append Of File)
1.RDB(Redis DataBase)
1.1 RDB是什么
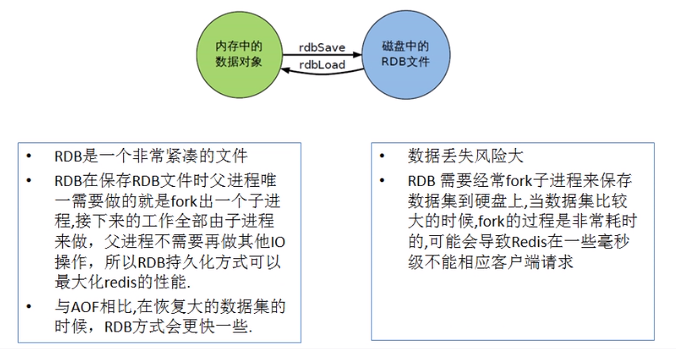
在指定的时间间隔内将内存中的数据集快照写入磁盘, 也就是行话讲的Snapshot快照,它恢复时是将快照文件直接读到内存里
1.2 备份操作是如何进行的
Redis会单独创建(fork)一个子进程来进行持久化,会先将数据写入到 一个临时文件中,待持久化过程都结束了,再用这个临时文件替换上次持久化好的文件。 整个过程中,主进程是不进行任何IO操作的,这就确保了极高的性能 如果需要进行大规模数据的恢复,且对于数据恢复的完整性不是非常敏感,那RDB方式要比AOF方式更加的高效。RDB的缺点是最后一次持久化后的数据可能丢失。
1.3 Fork
- Fork的作用是复制一个与当前进程一样的进程。新进程的所有数据(变量、环境变量、程序计数器等) 数值都和原进程一致,但是是一个全新的进程,并作为原进程的子进程
- 在Linux程序中,fork()会产生一个和父进程完全相同的子进程,但子进程在此后多会exec系统调用,出于效率考虑,Linux中引入了 “写时复制技术”
- 一般情况父进程和子进程会共用同一段物理内存,只有进程空间的各段的内容要发生变化时,才会将父进程的内容复制一份给子进程。
1.4 RDB持久化流程

配置
配置文件 redis.conf 中的快照配置
################################ SNAPSHOTTING  ################################
# Save the DB to disk.
#
# save <seconds> <changes>
#
# Redis will save the DB if both the given number of seconds and the given
# number of write operations against the DB occurred.
#
# Snapshotting can be completely disabled with a single empty string argument
# as in following example:
#
# save ""
#
# Unless specified otherwise, by default Redis will save the DB:
#   * After 3600 seconds (an hour) if at least 1 key changed
#   * After 300 seconds (5 minutes) if at least 100 keys changed
#   * After 60 seconds if at least 10000 keys changed
#
# You can set these explicitly by uncommenting the three following lines.
#
# save 3600 1
# save 300 100
# save 60 10000
# By default Redis will stop accepting writes if RDB snapshots are enabled
# (at least one save point) and the latest background save failed.
# This will make the user aware (in a hard way) that data is not persisting
# on disk properly, otherwise chances are that no one will notice and some
# disaster will happen.
#
# If the background saving process will start working again Redis will
# automatically allow writes again.
#
# However if you have setup your proper monitoring of the Redis server
# and persistence, you may want to disable this feature so that Redis will
# continue to work as usual even if there are problems with disk,
# permissions, and so forth.
stop-writes-on-bgsave-error yes
# Compress string objects using LZF when dump .rdb databases?
# By default compression is enabled as it's almost always a win.
# If you want to save some CPU in the saving child set it to 'no' but
# the dataset will likely be bigger if you have compressible values or keys.
rdbcompression yes
# Since version 5 of RDB a CRC64 checksum is placed at the end of the file.
# This makes the format more resistant to corruption but there is a performance
# hit to pay (around 10%) when saving and loading RDB files, so you can disable it
# for maximum performances.
#
# RDB files created with checksum disabled have a checksum of zero that will
# tell the loading code to skip the check.
rdbchecksum yes
# Enables or disables full sanitation checks for ziplist and listpack etc when
# loading an RDB or RESTORE payload. This reduces the chances of a assertion or
# crash later on while processing commands.
# Options:
#   no         - Never perform full sanitation
#   yes        - Always perform full sanitation
#   clients    - Perform full sanitation only for user connections.
#                Excludes: RDB files, RESTORE commands received from the master
#                connection, and client connections which have the
#                skip-sanitize-payload ACL flag.
# The default should be 'clients' but since it currently affects cluster
# resharding via MIGRATE, it is temporarily set to 'no' by default.
#
# sanitize-dump-payload no
# The filename where to dump the DB
dbfilename dump.rdb
# Remove RDB files used by replication in instances without persistence
# enabled. By default this option is disabled, however there are environments
# where for regulations or other security concerns, RDB files persisted on
# disk by masters in order to feed replicas, or stored on disk by replicas
# in order to load them for the initial synchronization, should be deleted
# ASAP. Note that this option ONLY WORKS in instances that have both AOF
# and RDB persistence disabled, otherwise is completely ignored.
#
# An alternative (and sometimes better) way to obtain the same effect is
# to use diskless replication on both master and replicas instances. However
# in the case of replicas, diskless is not always an option.
rdb-del-sync-files no
# The working directory.
#
# The DB will be written inside this directory, with the filename specified
# above using the 'dbfilename' configuration directive.
#
# The Append Only File will also be created inside this directory.
#
# Note that you must specify a directory here, not a file name.
dir ./
RDB 是整合内存的压缩过的 Snapshot,RDB 的数据结构,可以配置复合的快照触发条件。
save
save 3600 1
save 300 100
save 60 10000
默认:
- 1 分钟内改了 1 万次
- 5 分钟内改了 10 次
- 15 分钟内改了 1 次
如果想禁用 RDB 持久化的策略,只要不设置任何 save 指令,或者给 save 传入一个空字符串参数也可以。
若要修改完毕需要立马生效,可以手动使用 save 命令,立马生效 。
stop-writes-on-bgsave-error
如果配置为 no,表示你不在乎数据不一致或者有其他的手段发现和控制,默认为 yes。
rbdcompression
对于存储到磁盘中的快照,可以设置是否进行压缩存储。
如果是的话,redis 会采用 LZF 算法进行压缩,如果你不想消耗 CPU 来进行压缩的话,可以设置为关闭此功能。
rdbchecksum
在存储快照后,还可以让 redis 使用 CRC64 算法来进行数据校验。
但是这样做会增加大约 10% 的性能消耗,如果希望获取到最大的性能提升,可以关闭此功能。
默认为 yes。
触发
- 配置文件中默认的快照配置,建议多用一台机子作为备份,复制一份 dump.rdb。
- 保存配置:
- save:只管保存,其他不管,全部阻塞。
- bgsave:Redis 会在后台异步进行快照操作,快照同时还可以响应客户端请求。
- lastsave:获取最后一次成功执行快照的时间。
- 执行 flushall 命令,也会产生 dump.rdb 文件,但里面是空的,无意义 。
- 退出的时候也会产生 dump.rdb 文件。
恢复
将备份文件 dump.rdb 移动到 redis 安装目录并启动服务即可。
本地数据库存放目录:
127.0.0.1:6379> CONFIG GET dir

1) "dir"
2) "/root"
优缺点
优点
- 适合大规模的数据恢复。
- 对数据完整性和一致性要求不高时适用。
缺点
- 在一定间隔时间做一次备份,所以如果 redis 意外 down 掉的话,就会丢失最后一次快照后的所有修改。
- Fork 的时候,内存中的数据被克隆了一份,大致 2 倍的膨胀性需要考虑。
2.AOF
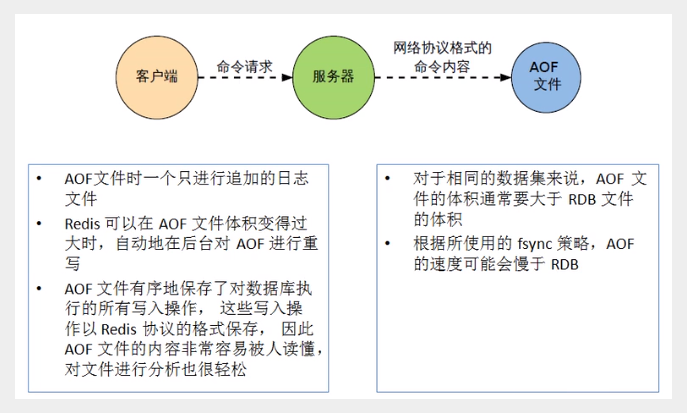
AOF,即 Append Only File
以日志的形式来记录每个写操作,将 Redis 执行过的所有指令记录下来(读操作不记录)。
只许追加文件,但不可以改写文件,Redis 启动之初会读取该文件重新构建数据。
换言之,Redis 重启的话就根据日志文件的内容将写指令从前到后执行一次以完成数据的恢复工作。

配置
AOF 保存的是 appendonly.aof 文件:
# 是否以append only模式作为持久化方式,默认使用的是rdb方式持久化,这种方式在许多应用中已经足够用了
appendonly no
# appendfilename AOF 文件名称
appendfilename "appendonly.aof"
# appendfsync aof持久化策略的配置:
#     no:不执行fsync,由操作系统保证数据同步到磁盘,速度最快。
#     always:每次写入都执行fsync,以保证数据同步到磁盘。
#     everysec:每秒执行一次fsync,可能会导致丢失这1s数据。
appendfsync everysec
# 重写时是否可以运用Appendfsync,用默认no即可,保证数据安全性
No-appendfsync-on-rewrite
# 设置重写的基准值
Auto-aof-rewrite-min-size
# 设置重写的基准值
Auto-aof-rewrite-percentage
恢复
正常恢复
- 启动:修改配置。修改默认的 appendonly no,改为 yes。
- 复制:将有数据的 aof 文件复制一份保存到对应目录(config get dir)。
- 恢复:重启 redis 然后重新加载。
异常恢复
- 启动:修改配置。修改默认的 appendonly no,改为 yes。
- 破坏:故意破坏 appendonly.aof 文件(写一些非 Redis 命令)。
- 修复:
redis-check-aof --fix appendonly.aof进行修复。 - 恢复:重启 redis 然后重新加载。
重写
AOF 采用文件追加方式,文件会越来越大,为避免出现此种情况,新增了重写机制。
当AOF文件的大小超过所设定的阈值时,Redis 就会启动 AOF 文件的内容压缩。
只保留可以恢复数据的最小指令集,可以使用命令 bgrewriteaof。
重写原理
AOF 文件持续增长而过大时,会 Fork 出一条新进程来将文件重写(也是先写临时文件最后再 rename)。
遍历新进程的内存中数据,每条记录有一条的 set 语句。
重写 aof 文件的操作,并没有读取旧的 aof 文件,这点和快照有点类似。
触发机制
Redis 会记录上次重写时的 AOF 大小,默认配置是当 AOF 文件大小是上次 rewrite 后大小的 1 倍且文件大于 64M 时触发。
优缺点
优点
- appendfsync always:每次修改同步。同步持久化,每次发生数据变更会被立即记录到磁盘。性能较差,但数据完整性比较好。
- appendfsync everysec:每秒同步。异步操作,每秒记录 ,如果一秒内宕机,有数据丢失。
- appendfsync no:不同步。从不同步。
缺点
- 相同数据集的数据而言,AOF 文件要远大于 RDB 文件,恢复速度慢于 RDB。
- AOF 运行效率要慢于 RDB,每秒同步策略效率较好,不同步效率和 RDB 相同。